FOR MORE GREAT DECORATING IDEAS: Don’t forget to check out our 2012 no-carve pumpkin decorating post here and our 2013 no-carve pumpkin decorating post here.
After 5+ visits to orchards and fall festivals this season, we have definitely cultivated quite the pumpkin collection. Here’s what my doorstep looks like right now:

Look familiar? Not too inspired, but who’s got time to decorate all those pumpkins? We all do! Put away the sharp tools and forget that goopy mess. We’ve scoured the Internet for the best no-carve pumpkin decorating ideas that range from create-it-with-your-kids to get-it-done-during-nap-time. And we’ve collected them for you here, all in one place. We promise, you’ll have a spiffy front stoop in no time!
As a bonus, we’ve even taken a few of these ideas for a test drive. And of course, we’re sharing the play-by-play.
Happy decorating!

NO-CARVE PUMPKINS
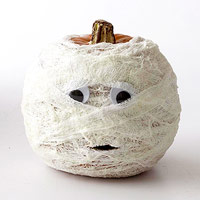
#1: Mummy knows best

So spooky! We love this new take on the classic pumpkin head. Plus, who cares if your gourd has blemishes or bumps. You won’t even see them! Click here for more details.
Source: bhg.com
#2: The cat’s meow


 A purrrrfect way to decorate a whole mess of pumpkins. Click here for more details.
Source: parents.com
#3: Right on the nose
 Feeling stuck in a pumpkin rut?Sometimes you just need to look at things from a different angle. Click here for more details.
Source: parents.com


#4: High hopes
 Take pumpkin decorating to new heights with this clever idea. The site calls for faux, craft pumpkins, but we think it could work just as well with the real thing. Click here for more details.
Source: hgtv.com
#5: These are a hoot
 Be kind to your fine, feathered friends. Or at least let them inspire your latest pumpkin decor. The site calls for carving, but we think these would look just as cute sans illumination. Click here for more details.
Source: bhg.com
#6: How sweet it is
 We can’t believe someone didn’t think of this sooner. Use candy to decorate your Halloween pumpkins? That trick is definitely a treat! Click here for more details.
Source: marthastewart.com
#6: A bug’s life

Even creepy crawlers look chic when stenciled on a pumpkin. Click here for more details.
Source: countryliving.com
#7: The golden age
 Give your pumpkins the Midas touch. Click here for more details.
Source: countryliving.com
#8: Next at bat
 Talk about going batty! We love the basic black silhouettes. Try it with a bat, a cat, or even a rat. Click here for more details.
Source: realsimple.com
#9: Pumpkin masquerade
 No crafting required! Just pick up a spooky, creepy, silly, or chic mask at the local party store. Done.
Source: countryliving.com
#10: All in the family
 These whimsical pumpkin people take a cue from their snowy relatives. Of course, these won’t melt away on a sunny day. Click here for more details.
Source: marthastewart.com
ADVENTURES IN PUMPKIN DECORATING:
As promised, Mandy and I took on a couple of our favorite finds. Here’s how it went.
Mandy’s Pumpkin
The Inspiration:
 Pretty ribbons transform this pumpkin from gourd to gorgeous in minutes.
The Imitation:
Step-by-Step Guide
1. Get supplies: Gather your favorite ribbons and your choice of adhesion options. I chose to use gold thumb tacks because, for the life of me, I couldn’t find my hot glue gun. A hot glue gun would work as well.
2. Cut ribbon: Measure the ribbon length needed for your pumpkin and leave a little extra length to work with. Cut ribbon to length needed.
3. Attach the top
4. Attach the bottom
 5. Cut off excess ribbon
6. Check your work: Make sure you are happy with your finished product. I wasn’t so I decided to add more ribbon.
7. Make adjustments as needed
8. Top it off with a pretty bow

Shawna’s Pumpkin
The Inspiration:
 Sparkly bows, playful dots, and a personalized monogram take this pumpkin from humble to haute in no time.
Source: http://ramblingssg.blogspot.com/2011/09/jack-em-up.html
The Imitation:
Step-by-Step Guide
1. The official instructions for creating this little cutie call for letter and dot stickers, but I decided to get creative with what I already had kicking around the house. I had a bunch of ribbons left over from Boo’s baby gifts. I also had half a dozen paint samples left over from various home improvement projects over the years. Blue ribbon, blue paint. I decided to make a “baby boy” pumpkin. I gathered together my supplies. I decided to go free hand with a paint brush for the monogram “B”, but for the spots I was pleased to finally find a new use for some of those old bottle parts we don’t need anymore. A bottle ring makes a perfect dot stencil!
 2. I started with the “B”, which I guess could stand for baby, boy, or Boo!
3. Next, with the ring as a guide, I used a swirling motion with the brush to paint on some dots (the ring is not quite as secure as a stencil, so you might not get quite as sharp an edge to your spots).
4. I let everything dry for about 20 minutes, then gave it a second coat. HINT: Put the end of your paint brush in a sandwich bag and wrap it with a rubber band to keep it from drying out between coats. That way you only have to wash one brush.

5. For the ribbon application, first I cut the excess stem off the top of my pumpkin so the bow would have a nice flat surface to sit on.
6. The official instructions say to cut the ribbon into strips and secure the bow in the center with wire, but I wanted that loopy effect that comes with folding over the ribbon to create a bow. Start with your first piece of ribbon (I used 3 different lengths of ribbon). Fold over one end to create the first loop of your bow. Pinch the loop in the center with your thump and index finger. This will be the center of your bow.
7. Create another loop by folding over the long section of ribbon (this loop should be roughly the same size as your first loop). Continue to create the loops, twisting the angle of each loop slightly to create a rounded bow.
 8. Keeping a tight pinch on the first ribbon, start adding any additional ribbon to the bow. Repeat until you have looped all of your ribbons into the bow.
9. I didn’t have any wire anyway, but I don’t think it would have been as effective to cinch my bow together. Instead, I just used a regular old straight pin (the kind you use to pin up the hem on your pants before you sew it). Not only did this work great to secure the pieces of the bow together, but I just stuck the pin, bow and all, into the stem stump left on my pumpkin.
 10. The pin method also allows for a little wiggle room when you place the bow on your pumpkin. Tug the loops around gently until the bow has the exact look you were going for. And voila! My baby boy pumpkin.
 This would make a really adorable gift if you know someone who has brought home a new baby this fall. It would also be a precious accessory for “baby’s first Halloween” photos.
MORE IDEAS:
You didn’t think we would stop there did you?
No time at all? Here’s a no-prep solution. Order these adorable pumpkin holders (I couldn’t resist) and presto! Instant decor!

No pumpkin? No problem! Pick up some paperboard pumpkins from the party store and a few paint stirring sticks from the hardware store. Attach the sticks to the back side of the pumpkins with hot glue. Just as cute as the real thing, but these will keep until next year.

Still seeking inspiration? Martha Stewart was recently on the Today Show offering up her latest pumpkin creations. You can see those ideas and many more on her site. Visit http://www.marthastewart.com/276965/halloween#/852946 for dozens of great pumpkin crafts.
You can also check out our Pinterest page where we’ve collected lots of other unique examples to show you. Plus, we’ll keep adding our newest favorites right up until the big day. There’s even a few carving ideas for all you pumpkin purists out there. So give a few of these fast, easy pumpkin crafts a try. Then you’ll have plenty of time left over to work on your costume. Sorry, you’re on your own for that one 🙂
Happy Halloween!
COMING UP:
Join us early next week when we enroll in farm animals 101. Then get ready for Halloween with our guide to trick-or-treating with the stroller set.
I love the mummy!
I’ve never thought about it, but decorating without carving is so much saver then carving out a pumpkin. I think kids would have so much more fun decorating the pumpkin anyway!
We think so too! Plus, even if the kiddos can’t help with all the decorating steps, at least there’s no chance they will accidentally get their hands on something sharp while you are up to your elbows in pumpkin innards 🙂
Love it! Great ideas.